
Once you have put together some great outfits, you might be interested in showing them off via screenshots, perhaps on your own blog or website or on the LOTRO forums’ amazing and longstanding “Show us your favourite outfit” thread. Here are some screenshotting tips to help you present your outfits at their best.

First, make sure you are using the high-resolution LOTRO client as opposed to the standard-resolution client. I believe the high-resolution client is the default these days, so most people should already have it. You can quickly confirm that you are using the high-res client by going to Options > Graphics > Quality and then take a look at the Overall Graphics Quality dropdown menu. If you see Ultra-high as an option in the dropdown, you have the high-res client (the standard client only goes to Very High). If you find that you don’t have the high-res client, my understanding is that you can choose in-client to upgrade to the high-res client. Alternatively you could download and reinstall the LOTRO client.

First, make sure that you are running LOTRO at your monitor’s maximum appropriate resolution, in full-screen mode (as opposed to windowed mode), so that your screenshots will be as large as possible.
Naturally, your screenshots will look their best if you run LOTRO on maximum graphics settings, but understandably this isn’t possible on all machines. If you’re not able to run at Ultra-high graphics settings, lower your settings to the highest level that your machine can comfortably handle by going to Options > Graphics > Quality and selecting an appropriate option from the Overall Graphics Quality dropdown. You want to be able to move around at a reasonable frame rate (30+) as this will be important for posing your screenshots. If you do have to reduce your overall graphics quality somewhat, there are nevertheless two important settings to turn up during your screenshot sessions (you can lower them again for regular gameplay). These are Antialiasing (Options > Graphics > Display) and Texture Detail (Options > Adv Graphics > Texturing). I find that lower graphics settings are easily overlooked as long as these two items are set as high as possible, so crank these two up as high as your machine can accommodate.
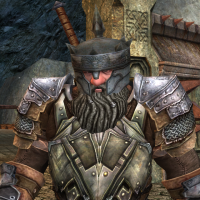
Tip: If you have DX11 dynamic shadows turned on, you may wish to disable them (Options > Adv Graphics) for some screenshots, especially if your outfit includes a brimmed hat or hood. The DX11 dynamic shadows allow the brim of the hat or hood to cast a shadow over the face, but unfortunately this seems to currently be bugged such that the shadow only affects the lower part of the face while the upper part remains fully-lit, which can look a little strange.
Finally, in preparation for taking your screenshots, make sure to turn off the UI (F12) and floating names (N). I also like to turn off floating damage and floating experience if I will be taking screenshots during combat. For combat shots, you may also sometimes wish to disable floating renown/infamy and floating destiny if necessary. If I have chosen a location for screenshots that has NPCs in the background, I like to disable overhead quest icons overhead non-quest icons as well (Options > UI Settings > Floating Information).
I also like to disable combat hit effects and avatar attack effects (Options > UI Settings > Special Effects Options), even if I’m not taking combat screenshots, because I usually execute skills to create poses and I don’t want to see the skill special effects (glows and particles and so on) in my screenshots. This is a stylistic choice, and you may wish to leave them enabled. If taking combat shots, I also disable monster attack effects and blood effects.
Tip: If your character is drunk or in an area of dread where you want to take clear screenshots, disable dread effects to get a nice clear shot (Options > UI Settings > Special Effects Options).
Finally, when taking combat screenshots, I disable “show the vitals of your selection’s target”, the directional selection indicator, combat particle response indicators, and persistent area effect visualization (Options > Combat Options > General Combat) as these can all interfere with screenshots.

If you’re taking screenshots to show off an outfit, it is usually best to take your screenshots in an outdoor location during the in-game daytime. I often prefer to choose a location where the horizon or a pleasing distant landscape is visible behind my character so that the background doesn’t compete too much with the outfit, particularly around the upper body and head. It’s usually a good idea to move your character away from walls or other surfaces because the textures for these can sometimes look low-res when you zoom your camera in to take your screenshots.
In many cases choosing the right background in terms of colour and environment can greatly enhance the presentation of your outfit, so think about the theme and context of your outfit when choosing a place to take screenshots. In addition to thinking about the various zones and locales in the open world where you can take your screenshots, don’t forget to consider skirmish and instance spaces as well, as many of these have very dramatic environmental and lighting effects.

As mentioned above, you can achieve the best lighting outside during the daytime. Note that different zones have different ambient effects that can affect the quality of the sunlight. For example, the Shire and Bree-land both have very clear atmospheres, while places like the Old Forest, Mirkwood, and Lothlórien have a somewhat misty effect that does not always work well in screenshots. The colour of the light can vary too; for example, the sunlight in the Shire and Bree-land is white, while the Old Forest’s is bluish and Lothlórien’s is golden.
Tip: In places like Lothlórien, if the misty environment is interfering with your screenshots, you can tone the effect down or eliminate it by lowering the bloom slider (Options > Advanced Graphics > Post Processing).
Sunlight in LOTRO always comes from the southwest, so make sure to face your character southwest to take maximum advantage of the sunlight. If you are taking a screenshot of your character from behind, then naturally you want to face your character to the northeast. Make sure that no shadows from tree branches or other objects are falling across your character. For a more dramatic look, you may wish to angle your character to the west or south so that they are fully lit on one side and in shadow on the other, but this can sometimes make your outfit appear washed out. Experiment with your character’s exact facing to get a combination of lighting and background that works best for your screenshot.

For night shots, interior shots, and in areas where the lighting is poor, see if you can locate an in-game light source such as a torch, firepit, or glowing crystal. If you position your character appropriately, light sources like these can add a lot of brightness to your image (but be warned that this light is often coloured light that can change the look of your outfit). You can also use the personal light (default keybind is Alt+F10) to position a neutral-coloured light slightly to your character’s right. Pressing Alt+F10 several times cycles through the three settings of the personal light: off, positioned in front of your character, and positioned behind your character.

You can take screenshots using the LOTRO client’s built-in functionality (the default keyboard command is Print Scrn), but I recommend using FRAPS instead. FRAPS is a popular screen capture and video-capture application. The basic version is free to download and use and has everything that you need to take great screenshots.
Using FRAPS rather than LOTRO’s built-in screenshot functionality gives you two huge advantages. For one, you can set FRAPS to save your screenshots as bitmaps (.bmp) instead of as JPEGs (.jpg), whereas the LOTRO client saves screenshots as JPEGs only. Bitmaps have less image quality loss than JPEGs and therefore look more clear and colourful — more true to what you see on your screen when you are playing the game. The other huge benefit FRAPS provides is that screenshots are taken instantly. If you use the LOTRO client’s built-in functionality, the client assigns the screenshot a file name by accessing your LOTRO screenshot folder each time you hit Print Scrn to determine what the next available file name is. As you build up more and more screenshots, the delay to take a screenshot becomes longer and longer, making it difficult to catch dynamic poses. This does not happen when using FRAPS, so you can take dozens of screenshots per minute — as fast as you can tap the screenshot key — allowing you to capture very specific poses.

Using the number pad, rotate the camera so that your character appears at the desired angle. I also like to swing the camera low toward the ground so that a lot of ground texture is not visible. Finally, zoom in as desired using the mouse wheel or ‘7’ and ‘9’ on the number pad (I find that using the number pad to zoom offers somewhat finer control than the mouse wheel, but this may vary depending on your mouse). For a full-body shot, I zoom in so that the character’s feet are just brushing the bottom of the screen.

Exciting, dynamic poses really make your screenshots come alive. There are a number of ways to create interesting poses for your screenshots. You can execute one of your character’s skills and quickly take a series of screenshots while the skill’s animation is playing. I assigned the F11 key to FRAPS so that I can execute a skill, then quickly hide my UI with F12 and immediately begin hitting F11 to capture screenshots. (You can also hide your UI first, then execute a skill using the keyboard before taking screenshots. I often do this if I want to execute skills while walking or running.) You can assign the screenshot key in the options for FRAPS; you may need to check your LOTRO keybindings (Options > Key Mapping) to make sure that they key you want to use for FRAPS is not already bound to another command in LOTRO. Using skills to create poses works best with self-targeted or area-of-effect skills, but you can also use targeted skills against enemies that are carefully positioned out of the screenshot, or positioned so that they can later be cropped out of the screenshot.
Tip: When using skill animations to create poses, I like to disable all the various special effects that accompany the skills. This is an aesthetic choice; you may prefer to leave them active. See “Graphics Settings” above for a list of the items I typically disable for combat screenshots.
Another good option that works for creating poses is of course emotes. Since your screenshot will reflect just one instant of the full animation, you can use emotes to create poses that make your character look like they are doing something completely unrelated to the actual emote. For example, if you get a screenshot at the right moment and from the right angle, /handstand is a great emote to use to pose your character as if he or she is carefully searching the ground for tracks or stooping to the ground.
Tip: You can manually enter an emote command before quickly hiding your UI and taking screenshots, or you can create a macro for your desired emote so that you can easily click it or use a hotkey to execute it.
Be sure to use /mood emotes to your advantage as well. You can use them for their intended purpose, which is to make your character look happy, angry, confused, or whatever, but there is another clever way to use them. Many skills and emotes include facial animations that may not be appropriate to the theme or feeling you are trying to create for your particular outfit. Setting a /mood will override these animations. For example, I often use /mood_solemn to keep my characters’ mouths shut during emotes and skill executions.
Finally, using consumables and devices with animations, as well as the /music mode, fishing, or crafting, are great ways to create poses as well. And don’t forget mounted emotes and mounted combat skills as well. Anything that makes your character perform an animation is fair game, so be as creative as you like!

When selecting screenshots to present, I always try to look for a good balance between a dynamic, interesting pose and a well-lit, unobstructed view of an outfit. In my posts on The Starry Mantle, I typically present four screenshots of an outfit: a close-up of the character from the waist up, an “action pose”, a back shot, and a neutral pose that displays the outfit to its fullest. In outfits with subtle combinations of colour or texture, the clearer your screenshots are, the more the outfit will “work” in the screenshots.

A final editing of your screenshots will give you the best results. You can use any graphics or photo-editing software for this, for example Photoshop. GIMP is a popular free-to-use option. I personally use an ancient version of Paint Shop Pro (version 7, released in 2000!) for my screenshots on The Starry Mantle, which I hope illustrates the point that you definitely do not need the latest and the greatest image manipulation software.
The most important editing task you will want to do is to crop your screenshots. Cropping is key to getting a nice, clear, large-scale view of your character and your outfit. When you insert an uncropped screenshot into a blog or a post on the LOTRO forums, if your screenshot is too large, it may be automatically resized to fit the width of the post or page, possibly resulting in a very tiny view of your character. Therefore, crop your screenshot so that your character fills most of the final image. If you’re going to be presenting your screenshots on a blog or website, determine the width of your content area and crop your screenshots to that exact width (this prevents auto-resizing that some blogging platforms may attempt that can leave your screenshots looking blurry). Fairly tight cropping also makes the outfit take central focus in the screenshot; it can become a bit lost if too much background is visible.
Another editing task that you can do is to repair clipping. Some outfit and armour pieces in LOTRO “clip” through other pieces. This means that certain parts of an outfit that should be “underneath” another piece poke through. This is easy to fix using your image manipulation software, and there are a variety of ways to do it. My personal go-to method is to use a clone-brush or similar tool to grab textures from the surrounding piece and replace the clipped areas.
Sometimes, particularly with DX11 dynamic shadows enabled, harsh shadows can show up on your character’s face and neck. You can always disable DX11 dynamic shadows to avoid this issue, but from time to time you may need to correct this issue in a screenshot. Of course there are many ways to use image manipulation software to do this, but the method I like to use is “averaging”. Often this tool is grouped with the various “blur” tools in the application. I also use the average tool to blur hat-lines and jawlines that look too sharply defined as well as the edges of hills and horizons in the background that look a little too sharp and low-res. If you have distant imposters enabled in your graphics settings, distant trees can sometimes look too pixelated, and a blurring or averaging tool is a good way to correct this problem as well.
You may wish to brighten an image if you took your screenshots in a poorly lit area or an area where colours are washed out due to lighting effects. There are many ways to do this depending on the image editing software that you’re using, and it can improve the look of your screenshots dramatically.
Finally, if you have used FRAPS or some other option to take screenshots in .bmp format, make sure to save your finished screenshot as a .png or .tif (unless the site where you’re publishing your pictures accepts .bmp files, in which case you can leave them as .bmps if you wish). The important thing to remember is not to save them as .jpgs, because doing so will result in some loss of image quality.

I hope these tips have been helpful and have given you some inspiration to take great screenshots of your favourite outfits and share them with the rest of the LOTRO community!


Another tip for players who may not want to install FRAPS is to use Alt + PrtSc to copy a bitmap to the clipboard and then paste it into an image editor at full quality. However, this has the disadvantage that you can’t capture multiple screenshots in quick succession, which I find is often the key to getting exactly the right pose, especially in mid-animation.
That’s a great tip, and totally news to me. Thanks for sharing Fredelas! I agree that it would prevent that rapid-fire screenshotting that often results in great, surprising poses, but it would be wonderful for taking more static shots of landscapes, landmarks, NPCs and so on while still getting that higher bitmap quality.
great tip the bloom slider for landscape lighting, I don’t usually tweak advanced graphics but I will experiment with that 🙂 ’tis a very well written guide, nice work Starry! 😀
Thank you very much Gloredh, glad you enjoyed it! And glad I was able to inspire you to check out some different settings. As always, I look forward to seeing the results on your blog! 🙂
Great guide Starry! I’ve often been writing bits and pieces of this guide into various blog posts of mine, particularly while drafting my upcoming ones. It’s great to have a place and consolidated guide to which I can refer people from here forward. This too has been a project of mine, but I haven’t been around too often to update my “Taking a Screenshot” page.
By the way, I had no idea you could upgrade your standard res client to the high res one. I had to reinstall mine anyway a few weeks ago and I can tell you there’s a significant difference between the ultra high settings of the respective clients! I also never knew the /moods overrode skill animations…I’ll have to remember that!
Yay! Now I know another Paint Shop Pro 7 user 🙂
Yeah, PSP7 users unite! /highfive :p
Thanks so much for the kind comment, Nathrien. I read about your adventure with the high res client and I’m glad you’re now enjoying those nice textures. Great to hear the /mood idea was a helpful suggestion as well. Cheers! 🙂
Pingback: Wilwarin | Wandering Around Arda
Some great tips!
Thanks very much Limm! 😀
Great guide, however, I have a question. I’ve installed Fraps now that I have a new computer, and taken a huge bunch of screenshots in bmp format, but now WordPress won’t allow me to upload bmp images! So I wonder what the point is to use Fraps and save images as bmp, when you still have to use jpg on the blog sites? Is it something I’m not getting? (Total noob when it comes to this kind of stuff:P)
Hi there, glad you liked the guide.
Once you have your bmps from Fraps, next you want to process them in any image editing software (e.g., Photoshop, but you can use anything). Personally I use Paintshop Pro. Edit your images as desired and then save them as a file type that can be used by WordPress — I save all of mine as pngs and suggest that format for the best results. I’m not sure if WordPress accepts tiffs, but if it does, that is another good option.
Hope that helps!
Oh I see 🙂 I don’t have any other photo programs than the one that belongs to my digital camera, but I’m gonna see if it lets me save screenshots in other formats. I have a huge task ahead, re-capturing all my outfits with higher graphics settings 🙂 Thanks for the quick reply 🙂
This article will be my bible 🙂
TNX!
I’m glad it’s helpful! Welcome to the blog, and thanks for your kind comment. 🙂